

An H&E staining protocol is one of the most fundamental procedures in histology and pathology, used to prepare tissue sections so that pathologists can examine them clearly under a microscope. Without this staining process, most tissue samples would appear nearly colorless and structureless under a microscope, making it almost impossible to identify cells, tissue architecture, or signs of disease. This is why H&E staining remains the gold standard technique in histopathology laboratories worldwide.
What Is the H&E Staining Protocol? (Definition)
The H&E staining protocol refers to the standardized laboratory procedure used to stain thin sections of tissue with two dyes: hematoxylin and eosin. Hematoxylin stains the nucleus of cells (the structure containing genetic material) a deep blue-purple color, while eosin stains the cytoplasm and extracellular structures (the material surrounding cells) various shades of pink.
This combination allows pathologists to clearly distinguish different cellular and tissue components under a microscope, making it possible to identify normal tissue architecture as well as signs of disease, such as cancer, inflammation, or infection. The technique is sometimes referred to simply as “H&E staining” or “hematoxylin and eosin staining,” and it remains the most commonly performed staining method in histopathology laboratories around the world.
A Brief History of H&E Staining
The use of dyes to color tissue sections for microscopic examination dates back to the 19th century, during a period of rapid growth in the field of histology, the scientific study of the microscopic structure of tissues. Hematoxylin, derived from the heartwood of the logwood tree (Haematoxylum campechianum), was first used as a biological stain in the mid-1800s, though its staining properties only fully develop once it is oxidized into a compound called hematein and combined with a chemical called a mordant, which helps the dye bind properly to tissue.
Eosin, a synthetic dye first developed in the 1870s, was later paired with hematoxylin to create a contrasting counterstain, resulting in the combined H&E staining technique that became widely standardized in pathology laboratories by the early 20th century.
Over the following decades, as histopathology developed into a formal medical specialty, H&E staining became the universally accepted first-line staining method for tissue diagnosis. Despite the development of many other specialized staining techniques since then, H&E staining remains the essential starting point for nearly all tissue-based diagnostic evaluations today.
Classification of H&E Staining Methods
H&E staining protocols can be broadly classified based on their application setting and level of automation.
- Classification by Application Setting
Type | Common Setting | Purpose |
Routine diagnostic H&E staining | Hospital and clinical pathology laboratories | Standard tissue diagnosis for patient care |
Research H&E staining | Academic and research laboratories | Studying tissue structure in experimental studies |
Frozen section H&E staining | Intraoperative (during surgery) pathology labs | Rapid tissue evaluation during surgical procedures |
- Classification by Method of Application
- Manual H&E staining: Slides are moved through a series of staining and rinsing solutions by hand, typically used in smaller laboratories or for special cases.
- Automated H&E staining: Slides are processed using automated staining instruments that precisely control timing and solution exposure, commonly used in high-volume clinical laboratories to improve consistency and efficiency.
Hematoxylin Types Used in H&E Protocols
Hematoxylin Type | Common Use | Notes |
Harris hematoxylin | General-purpose routine staining | Widely used, produces reliable nuclear staining |
Mayer’s hematoxylin | Progressive staining method | Often used when a gentler, more controlled staining process is needed |
Gill’s hematoxylin | Routine and specialized staining | Available in different strengths for varying tissue types |
Components and Materials Used in the H&E Staining Protocol
A standard H&E staining protocol requires several key reagents and materials:
- Hematoxylin solution: The primary nuclear stain, which colors the cell nucleus blue-purple.
- Eosin solution: The counterstain, typically eosin Y, which colors the cytoplasm and connective tissue various shades of pink.
- Xylene or clearing agent: Used to remove paraffin wax from tissue sections before staining and to clear slides before applying a coverslip.
- Graded alcohol series: A sequence of alcohol solutions at decreasing concentrations, used to rehydrate the tissue before staining and to dehydrate it afterward.
- Acid alcohol (differentiation solution): A dilute acid-alcohol mixture used to remove excess hematoxylin stain, sharpening nuclear detail.
- Bluing reagent: A mildly alkaline solution used after differentiation to shift the hematoxylin stain to its final blue color.
- Mounting medium and coverslip: Applied at the end of the process to preserve the stained tissue section and protect it for long-term microscopic examination.
Principle of H&E Staining
The principle behind H&E staining relies on the different chemical properties of cellular structures and how they interact with the two dyes.
- Hematoxylin acts as a basic dye, meaning it carries a positive charge and binds strongly to acidic (negatively charged) structures, primarily the DNA and RNA found within the cell nucleus. This is why hematoxylin produces the characteristic blue-purple staining of the nucleus.
- Eosin acts as an acidic dye, carrying a negative charge, and binds to basic (positively charged) structures, primarily proteins found in the cytoplasm and extracellular matrix (the supportive material surrounding cells). This interaction produces the pink-to-red staining seen in the cytoplasm and connective tissue.
This contrast between blue-purple nuclei and pink cytoplasm allows pathologists to clearly evaluate cell shape, tissue organization, and abnormal changes that may indicate disease.
Working Principle and Mechanism of the Staining Process
Understanding the mechanism behind each staining step helps explain why the H&E staining protocol follows a specific order:
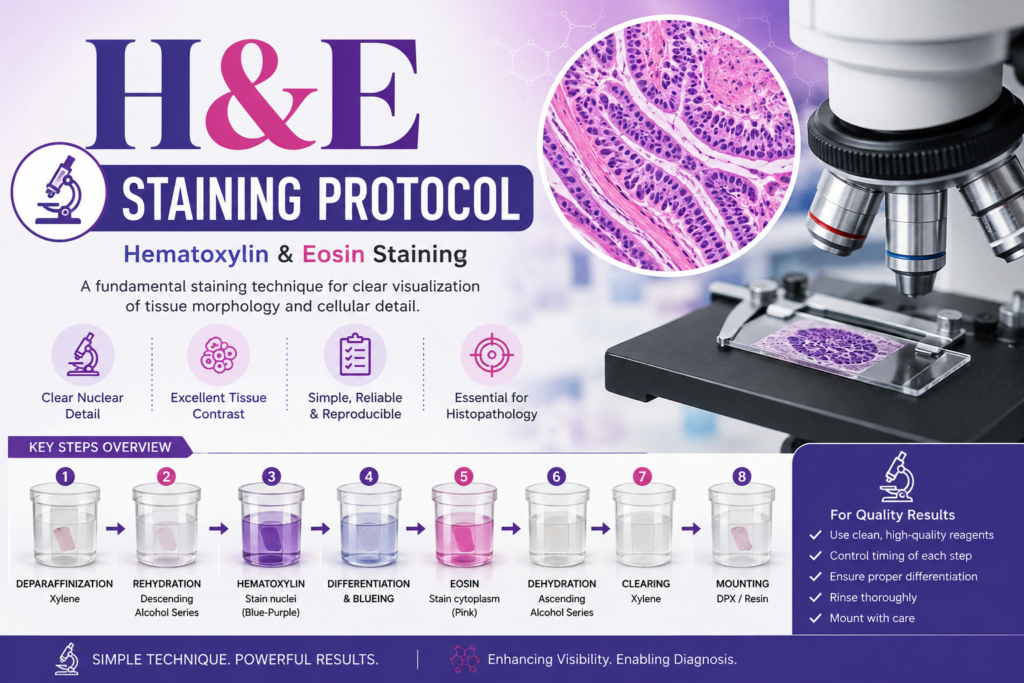
- Deparaffinization: Tissue sections, which are typically embedded in paraffin wax for stability during sectioning, must first have this wax removed using xylene or a similar clearing agent, since wax would block dye penetration.
- Rehydration: The tissue is passed through a graded series of alcohol solutions, moving from higher to lower alcohol concentrations, and finally into water, preparing the tissue for water-based staining solutions.
- Nuclear staining with hematoxylin: The tissue section is immersed in hematoxylin solution, allowing the dye to bind to the negatively charged nucleic acids within the nucleus.
- Differentiation: A brief rinse in dilute acid alcohol removes excess, non-specifically bound hematoxylin, sharpening the contrast of the nuclear staining.
- Bluing: Exposure to a mildly alkaline solution shifts the hematoxylin stain to its final, stable blue color, since hematoxylin appears reddish under acidic conditions and blue under alkaline conditions.
- Counterstaining with eosin: The tissue is then stained with eosin, which binds to cytoplasmic and connective tissue proteins, producing the pink coloration.
- Dehydration: The tissue passes back through a graded alcohol series, this time from lower to higher concentrations, removing water in preparation for mounting.
- Clearing: A final xylene step removes the alcohol and prepares the tissue for mounting, since mounting media are not compatible with water or alcohol.
- Mounting: A coverslip is applied using a mounting medium, preserving the stained tissue for long-term storage and microscopic examination.
Step-by-Step H&E Staining Protocol
Below is a general, standard H&E staining protocol commonly used in histopathology laboratories. Exact timing may vary slightly between laboratories based on tissue type and reagent concentration.
- Deparaffinize tissue sections in xylene, typically for two changes of 3–5 minutes each.
- Rehydrate sections through a graded alcohol series (100%, 95%, 70% ethanol), followed by a rinse in distilled water.
- Stain with hematoxylin for approximately 3–8 minutes, depending on the specific hematoxylin formulation used.
- Rinse in running tap water to remove excess stain.
- Differentiate briefly in acid alcohol (typically 1% acid alcohol) for a few seconds, then rinse again in water.
- Blue the sections using a bluing reagent or a dilute alkaline solution, followed by another water rinse.
- Counterstain with eosin for approximately 30 seconds to 2 minutes, depending on the desired intensity.
- Dehydrate through a graded alcohol series in reverse order (70%, 95%, 100% ethanol).
- Clear the sections in xylene, typically for two changes of a few minutes each.
- Mount the slide using an appropriate mounting medium and apply a coverslip, ensuring no air bubbles are trapped.
- Allow slides to dry according to laboratory protocol before microscopic examination or long-term storage.
Applications of the H&E Staining Protocol
H&E staining is used extensively across many areas of medicine, education, and research, including:
- Diagnostic histopathology: Identifying cancer, inflammation, infection, and other tissue abnormalities in biopsy and surgical specimens.
- Frozen section analysis: Providing rapid tissue evaluation during surgery to help guide immediate surgical decisions.
- Autopsy pathology: Examining tissue samples to help determine the cause of death or disease progression.
- Medical and veterinary education: Teaching students to recognize normal tissue architecture and pathological changes.
- Biomedical research: Studying tissue structure and disease models in laboratory research settings.
- Quality control in tissue banks: Assessing tissue integrity and suitability for research or transplantation purposes.
Advantages of the H&E Staining Protocol
- Universally recognized standard: H&E staining is consistently interpreted the same way across laboratories worldwide, supporting reliable communication between pathologists.
- Cost-effective: Compared to many specialized staining techniques, H&E staining uses relatively inexpensive reagents.
- Provides broad diagnostic information: A single H&E-stained slide can reveal a wide range of tissue and cellular details, often sufficient for an initial diagnosis.
- Well-established protocol: Decades of standardization make the technique reliable, reproducible, and well understood.
- Foundation for further testing: H&E-stained slides often guide decisions about whether additional specialized stains or tests are needed.
Disadvantages of the H&E Staining Protocol
- Limited specificity: H&E staining shows general tissue structure but cannot identify specific proteins, pathogens, or molecular markers, which require specialized stains or immunohistochemistry.
- Sensitive to timing errors: Even small deviations in staining or differentiation time can affect color intensity and diagnostic clarity.
- Requires skilled interpretation: Accurate diagnosis depends on a trained pathologist’s ability to interpret subtle color and structural differences.
- Tissue processing artifacts: Poor tissue fixation or processing before staining can affect the final appearance of the slide, regardless of staining technique quality.
- Not suitable for all diagnostic questions: Certain conditions require specialized stains, such as special stains for fungi, fibrosis, or specific cell markers, in addition to standard H&E staining.
Clinical Significance of H&E Staining
The H&E staining protocol holds enormous clinical significance because it forms the foundation of most tissue-based diagnoses in modern medicine. When a patient undergoes a biopsy, whether to investigate a suspicious lump, evaluate an organ during illness, or confirm a cancer diagnosis, the tissue sample is almost always first examined using H&E staining.
Pathologists rely on the clear contrast between blue-purple nuclei and pink cytoplasm to assess key diagnostic features, including:
- Cell size, shape, and organization, which can reveal abnormal or cancerous growth patterns.
- Tissue architecture, helping identify whether normal tissue structure has been disrupted by disease.
- Signs of inflammation or infection, often visible through changes in cell types and tissue appearance.
- Presence of abnormal structures, such as tumor cells, necrotic (dead) tissue, or fibrous scarring.
Because so many treatment decisions depend on accurate tissue diagnosis, the quality and consistency of the H&E staining protocol directly affects patient care.
Interpretation of H&E-Stained Slides
Interpreting an H&E-stained slide requires understanding what each color and structure represents.
Structure | Typical H&E Appearance | Clinical Relevance |
Cell nucleus | Blue-purple | Nuclear size, shape, and density help identify abnormal or cancerous cells |
Cytoplasm | Pink | Reflects protein content and cell type |
Collagen and connective tissue | Pink to pale pink | Helps assess tissue structure and fibrosis |
Red blood cells | Bright pink to orange-red | Useful for identifying areas of bleeding or vascular structures |
Muscle fibers | Deep pink with visible striations (in skeletal muscle) | Helps distinguish muscle tissue from other tissue types |
Pathologists examine these features under a microscope, often at multiple magnification levels, to build a complete diagnostic picture. While H&E staining alone often provides enough information for a diagnosis, additional stains or tests may be requested when more specific information is needed.
Frequently Observed Errors in H&E Staining
- Over-staining with hematoxylin, resulting in overly dark, muddy nuclear detail that obscures fine structural features.
- Under-differentiation, leaving excess background hematoxylin staining that reduces contrast and clarity.
- Weak or pale eosin staining, often caused by exhausted eosin solution or insufficient staining time.
- Incomplete deparaffinization, leaving residual wax that blocks even dye penetration and creates uneven staining.
- Air bubbles under the coverslip, which can obscure tissue detail and interfere with microscopic examination.
- Tissue folding or tearing during processing, which can distort tissue architecture and complicate interpretation.
- Inconsistent staining across a batch of slides, often caused by uneven reagent exposure or automated stainer malfunction.
Troubleshooting Common Problems
Problem | Possible Cause | Solution |
Nuclei appear too dark or muddy | Over-staining with hematoxylin | Reduce staining time or increase differentiation time |
Nuclei appear pale or unclear | Under-staining or over-differentiation | Increase hematoxylin staining time; reduce acid alcohol exposure |
Weak pink eosin staining | Exhausted eosin solution or insufficient staining time | Replace eosin solution; increase staining duration |
Uneven staining across the slide | Incomplete deparaffinization or reagent contamination | Ensure complete xylene clearing; replace contaminated reagents |
Air bubbles under coverslip | Improper mounting technique | Apply mounting medium carefully and avoid trapping air during coverslip placement |
Tissue washing off the slide | Poor tissue adhesion or overly aggressive rinsing | Use appropriate slide adhesive coating; handle rinsing steps gently |
Care and Maintenance of Staining Equipment and Reagents
Proper care of staining reagents and equipment supports consistent, high-quality results:
- Filter staining solutions regularly to remove debris and precipitate that can accumulate over time.
- Replace hematoxylin and eosin solutions according to laboratory protocol or when staining quality begins to decline.
- Monitor reagent expiration dates and replace expired solutions promptly.
- Clean staining racks, dishes, and automated stainer components regularly to prevent cross-contamination between staining runs.
- Calibrate and maintain automated staining instruments according to the manufacturer’s recommended schedule.
- Store reagents properly, away from direct light and at recommended temperatures, to preserve their staining performance.
Quality Assurance: IQC and EQA for H&E Staining
Because H&E staining underpins so many diagnostic decisions, quality assurance is a critical part of every histopathology laboratory’s operations.
Internal Quality Control (IQC) typically includes:
- Including known control tissue sections with each staining batch to confirm consistent staining quality.
- Performing daily visual quality checks of stained slides, assessing nuclear clarity, cytoplasmic contrast, and overall staining consistency.
- Documenting reagent lot numbers, preparation dates, and staining batch records for traceability.
- Conducting regular calibration and maintenance checks on automated staining instruments.
External Quality Assessment (EQA) typically includes:
- Participating in inter-laboratory proficiency testing programs, where laboratories stain and interpret standardized tissue samples and compare results against other participating laboratories.
- Undergoing periodic laboratory accreditation reviews, which often assess staining consistency and quality management practices.
Laboratories accredited under standards referenced by organizations such as the College of American Pathologists (CAP) or those following guidance aligned with CLSI (Clinical and Laboratory Standards Institute) typically include documented H&E staining quality assurance programs as part of routine laboratory operations.
Safety Precautions in the H&E Staining Protocol
- Work in a well-ventilated area or fume hood when handling xylene and other volatile reagents, since prolonged inhalation exposure can be harmful.
- Wear appropriate personal protective equipment (PPE), including gloves, a lab coat, and eye protection, throughout the staining process.
- Handle hematoxylin and eosin solutions carefully, as these dyes can stain skin and clothing and may cause irritation with prolonged contact.
- Dispose of xylene, alcohol, and staining waste according to your institution’s hazardous chemical waste disposal protocols.
- Store flammable reagents, such as xylene and ethanol, away from open flames or heat sources, following appropriate chemical storage guidelines.
- Report spills or exposure incidents immediately according to standard laboratory safety procedures.
Key Points
- The H&E staining protocol is the most widely used staining technique in histopathology, combining hematoxylin (a nuclear stain) and eosin (a cytoplasmic counterstain).
- Hematoxylin binds to acidic nuclear components, producing blue-purple staining, while eosin binds to basic cytoplasmic proteins, producing pink staining.
- The protocol follows a specific sequence: deparaffinization, rehydration, staining, differentiation, bluing, counterstaining, dehydration, clearing, and mounting.
- H&E staining is essential for diagnosing cancer, inflammation, infection, and many other tissue abnormalities.
- Common errors include over-staining, under-differentiation, and incomplete deparaffinization, all of which can compromise diagnostic clarity.
- Regular quality control, including known control tissues and proficiency testing, helps ensure consistent, reliable staining results across laboratories.
Conclusion
The H&E staining protocol may involve a series of carefully timed chemical steps, but its impact on modern medicine is profound. By transforming nearly colorless tissue sections into clear, richly detailed images, this technique allows pathologists to detect disease, guide treatment decisions, and ultimately support patient care around the world. Its long history, dating back over a century, speaks to just how effective and enduring this simple two-dye combination has proven to be.
Understanding the principle, procedure, and quality considerations behind H&E staining helps students, histotechnologists, and laboratory professionals appreciate the careful science behind every stained slide examined under a pathologist’s microscope. As new diagnostic technologies continue to emerge, the H&E staining protocol remains a trusted, foundational technique, proving that sometimes, the most essential tools in medicine are also among the most elegantly simple.
Frequently Asked Questions (FAQs)
What does H&E stand for in the H&E staining protocol?
H&E stands for hematoxylin and eosin, the two dyes used together to stain cell nuclei blue-purple and cytoplasm pink in tissue sections.
Why is H&E staining considered the gold standard in histopathology?
H&E staining is considered the gold standard because it consistently reveals detailed tissue architecture and cellular structure, providing a reliable foundation for most tissue-based diagnoses across pathology laboratories worldwide.
What does hematoxylin stain, and what color does it produce?
Hematoxylin stains the cell nucleus, producing a blue-purple color, because it binds to the negatively charged nucleic acids found within the nucleus.
What does eosin stain, and what color does it produce?
Eosin stains the cytoplasm and connective tissue proteins, producing shades of pink, because it binds to positively charged (basic) protein structures.
How long does a standard H&E staining protocol typically take?
A standard manual H&E staining protocol usually takes about 30 to 45 minutes from deparaffinization through mounting, though automated stainers can complete the process more quickly and consistently.
What causes uneven or inconsistent H&E staining results?
Uneven staining is often caused by incomplete deparaffinization, contaminated reagents, or inconsistent timing between staining steps, all of which can be addressed through careful protocol adherence and quality control.
Can H&E staining diagnose cancer on its own?
In many cases, H&E staining alone provides enough detail for an initial cancer diagnosis, though additional specialized stains or molecular tests are often used to confirm specific cancer types or guide treatment decisions.
Is H&E staining used only for human tissue samples?
No, H&E staining is also widely used in veterinary pathology and biomedical research to examine tissue samples from animals and experimental models.
What is the purpose of the differentiation step in H&E staining?
The differentiation step, using dilute acid alcohol, removes excess, non-specifically bound hematoxylin stain, improving the clarity and contrast of nuclear detail in the final stained slide.